


7 Steps to Pro-Grade Low Voltage Path Lights for Your Landscape


Choosing the right illumination for your property can transform a dark, potentially hazardous yard into a safe, welcoming extension of your home. If you've ever tripped over an uneven step or squinted to find your keys in the dark, you know the true value of reliable lighting. This is why more homeowners and landscapers are turning to low voltage path lights to define, secure, and beautify their landscape path lighting needs.
This guide is your complete resource. We have broken down the process into 7 expert steps, walking you through design decisions, selecting exterior path lights, and mastering the installation to ensure you benefit from bright, consistent light for years to come.

Step 1: Compare Low Voltage Path Lights vs. Solar Options
When planning your outdoor path lights, you might consider solar for its wireless convenience. However, low voltage path lights provide specific solutions where solar energy may fall short, offering a professional-grade alternative for your property.
|
Feature |
Low Voltage Path Lights (Pro Choice) |
Solar Lights (Basic Choice) |
|
Consistency & Weather |
100% Reliable (365 Days/Year): Draws regulated power from your home, guaranteeing bright, steady illumination regardless of rain, clouds, or winter. Essential for critical sidewalk lights. |
Weather Dependent: Performance fluctuates significantly based on cloud cover and shorter winter days, often leading to dim or dead lights when you need them most. |
|
Performance in Shade |
Works Anywhere: Since they are wired, they shine brilliantly even in the darkest, most shaded corners of your garden or under trees. Ensures your landscape path lighting is uniform. |
Requires Direct Sun: Solar panels must have direct sunlight to charge effectively. They will fail or perform poorly in shaded or wooded landscape areas. |
|
Installation & Safety |
The DIY "Sweet Spot." The 12V system is safe to handle and requires no deep trenching (unlike high voltage), yet offers the permanence and power of a wired system. Ideal for high-performance exterior path lights. |
Wireless: The easiest to install (stake and go), but lacks the permanence, durability, and consistent power output of a hardwired system. |
Step 2: Design Your Landscape Path Lighting Layout
Effective lighting is not about overpowering the darkness; it's about artfully guiding the eye. Before buying, sketch a plan to ensure the light serves a purpose.
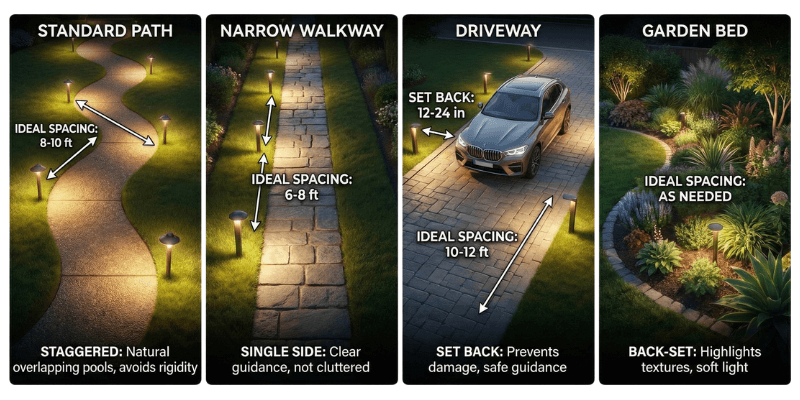
- The Spacing Rule: A common mistake is spacing lights too close, creating a "runway effect." For natural illumination, space your low voltage path lights 8 to 10 feet apart. The goal is creating overlapping pools of light rather than continuous beams.
- Sidewalks: When installing sidewalk lights, stagger them slightly on both sides of a wide path to ensure visibility without casting harsh shadows.
- Driveways: For low voltage driveway lights, durability is key. Place fixtures slightly off the pavement to avoid vehicle damage, and aim light downward to guide drivers without blinding them.
- Gardens: Garden path lights serve a dual purpose. Place fixtures slightly back into flowerbeds to cast soft light onto the path while simultaneously highlighting the texture of your plants.
Step 3: Select the Best Exterior Path Lights and Color Temperature
Your choice of fixture style and light warmth defines your home’s curb appeal.
- Fixture Types: Choose "Hat" or "Mushroom" styles for wide downward pools of light, or "Bollards" for a modern look.
- Material Matters: Invest in solid metal (brass or copper) for your exterior path lights. Unlike plastic, these materials resist corrosion and withstand the elements, providing superior long-term value.
- Color Temperature: For a warm, residential look, always choose LED bulbs in the 2700K to 3000K range. This soft white color mimics incandescent lighting and creates an inviting atmosphere.

Step 4: Calculate Power for Low Voltage Driveway Lights & Wiring
Before running cable, you must calculate your power needs to avoid dim lights.
1. Calculate Transformer Size: Add the total wattage of all lights and add a 25% buffer for future expansion.
- Formula: (Total Wattage) x 1.25 = Required Transformer Wattage.
2. Select Wire Gauge: Voltage drop kills brightness.
- For short runs (under 100 ft), 14-gauge (14/2) wire is usually sufficient.
- For longer runs or high wattage, use thicker 12-gauge (12/2) wire. When in doubt, always go thicker.
3. Mount the Transformer: Install it near a GFCI-protected outdoor outlet, mounted on a wall or post to keep it off the ground.
Step 5: Connect Your Garden Path Lights Like a Pro
The connection point is where many DIY systems fail. Do not use cheap clip connectors.
1. Lay Out the Cable: Run the main cable from the transformer along your planned path, leaving slack at each fixture location.
2. Make Waterproof Connections: Use professional-grade, waterproof connectors (often silicone-filled wire nuts). These seal the connection against moisture and prevent corrosion, which is the #1 killer of low voltage path lights.
Step 6: Test, Secure, and Bury Wiring for Sidewalk Lights
Never bury your wire before testing!
1. The Crucial Test: Connect the transformer to the outlet and turn the system on. Check every single light. If a light is dim or off, fix the connection now while it is accessible.
2. Shallow Trenching: Once tested, create a shallow trench (3 to 6 inches deep) using a flat-edged shovel.
3. Tuck and Cover: Place the cable in the trench and cover with soil or mulch. Ensure you leave a small coil of slack wire at each fixture to allow for future adjustments.
Step 7: Maintain Your Outdoor Path Lights for Longevity
Even the best systems need occasional care. Here is how to keep your outdoor path lights shining.
- Dim Lights (Voltage Drop): If lights at the end of the run are dim, you may have voltage drop. Check your wire gauge or consider splitting the lights into two separate runs back to the transformer.
- System Failure: If the whole system is out, check the GFCI outlet to see if it has tripped. Reset the outlet and check the transformer breaker.
- Single Light Failure: If just one garden path light is out, replace the bulb. If that fails, dig up the connector—loose or corroded connections are the most common culprit.
Top Recommendations for Your Landscape Path Lighting Project
Finding the right fixtures is just as important as the installation. Based on our experience, here are the top picks to get your project started.
Recommended Low-Voltage Path Lights
For the ultimate in durability and professional aesthetics, we recommend these top-rated low voltage path lights that feature solid construction and replaceable LEDs:
1. Kichler 12V Path Light 15478
The Kichler 12V Path Light 15478 is a low-voltage, weather-resistant outdoor path light with aluminum construction designed for durability in outdoor settings like walkways and patios. It is compatible with LED/Bi-Pin bulbs, though bulbs are not included. Installation is straightforward with a hardwired low-voltage setup.
kichler-12v-path-light
2. Volt Essentials Path Light Expansion Kit
Brass construction, integrated LEDs, and about 300 lumens per fixture at a warm 2700K make this kit one of the brightest and most durable choices for serious landscape projects. Best for homeowners who want long-term, professional-looking path lighting and already have or plan to add a transformer.
volt-conehead-path-light
3. Best Pro Lighting's Low Voltage Landscape Path Light
A low-voltage mushroom path light in a rust finish that adds a classic, decorative touch to gardens and walkways with an even 360° light distribution.
best-pro-lighting-path-light
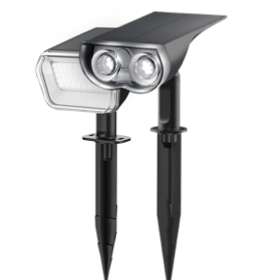
Best Alternative: Solar Path Lights
We understand that digging trenches or running wire isn't always possible, especially for renters or remote garden corners. If you need a wire-free solution, we recommend the Linkind SP6 Smart Solar Pathway Lights. Unlike standard solar lights, these offer smart control features and improved efficiency, making them a high-quality alternative when low voltage isn't an option.
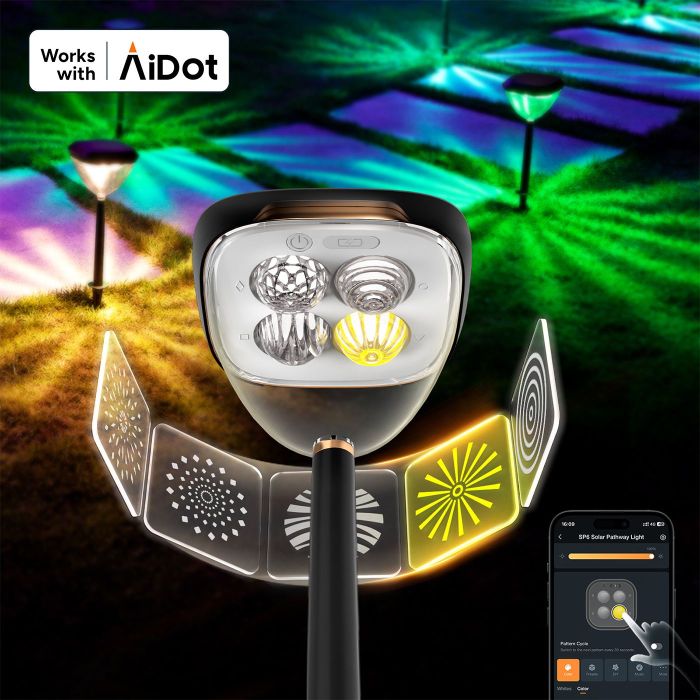
- Pattern Switching & Color Options: 4 lens slots, 5 lenses, and 16 million RGBW colors. Use the app to swap patterns, change colors, adjust brightness, and create stunning displays with solar pathway lights.
-
Dual Charging & MPPT Tech: Backup wired charging and high-efficiency MPPT solar charging enables brighter, longer-lasting solar lights with extended run times across all seasons.
-
Light Shows, Music Sync, & Scenes: Enjoy dazzling effects, preset scenes, and lights syncing to music. Color-changing landscape lights create the perfect mood for parties, holidays, and everyday ambiance.
-
Schedule, Automate, or App Control: Manage up to 8 groups of up to 32 lights each. Flexibly control your solar garden lights with dusk-to-dawn lighting, customized schedules, or manual app control.
-
Durable, Weather-Resistant Design: Built with reinforced ABS housing, these solar lights outdoor waterproof withstand heat, cold, and wind. Wire-free stake installation is quick and secure.

The Path Forward
By following these 7 steps, you move beyond simple DIY to a professional-grade installation. Low voltage path lights are a premium upgrade that delivers consistent safety and stunning aesthetics.
Ready to brighten your home exterior? Start designing your new system today. Shop our selection of durable brass and aluminum fixtures to begin your project.